Home » Process and Materials » Page 4

Category: Process and Materials

10 Ways to a More Ergonomic Mosaic Studio: The Art of Working with Pain

Breda Mosaic Nippers

1.  Set a timer, preferably in another room.  I set the timer for 17 minutes, and walking down the hallway to turn it off helps me be more mindful of my body.   A  5 minute break every hour doesn’t do it for me.  Yes, at first frequent breaks interrupted my flow, but now they are thoroughly part of it.

2.  Take a shoulder break by putting a 2 soft balls or empty 16oz water bottles, or small rolled up towels under my arms(anywhere from the pit to nearer the elbow) for a few minutes.  This position allows my shoulders to rest while different muscles are engaged, and I can keep mosaicing. The first time I read about this in Franklin’s Relax your Neck, Liberate Your Shoulders, I couldn’t imagine it helping, but it felt great.  I look funny, but, oh well.

3.  Wear a padded glove on your nipping hand.  

4.  Work on several different projects to vary the types of tasks I am doing.  Invariably, too much of one thing, whether it be nipping, gluing or grouting, increases my pain levels.

5.  Remember to breathe.  When I’m focusing intensely, I tend to hold my breath, and tense my muscles.

6.  Take a day off from the studio.  Yes, I love making mosaics.  Yes, I have orders to fill.  But to sustain my craftsmanship in the long term, I need to give my body a chance to decompress.

7.  Stand up to nip and glue.  This may not work for everyone, that’s the nature of ergonomics, not one size fits all.  But for me, having a tall drafting table and standing as I work allows me to get better leverage with nipping, using the big muscles in my arms and shoulders rather than just my hands.

8.  Lift up your work to avoid crafters’ hunch.  I elevate my work in progress on a box on top of my drafting table.  Sometimes I sit down to work, if standing is getting uncomfortable, and use a drawing table with an adjustable top, and elevate the surface to an angle just enough to get a better view without the tesserae sliding off.  If you glue the bottom row first, that can catch any errant pieces.

9.  Invest in a hammer & hardie.  This traditional mosaic cutting tool is an alternative to wheeled mosaic nippers, and you can cut chunks of smalti with the tap of the hammer.  The more types of tools, the options you have. 

10.  Consult a physical or occupational therapist who can guide you with appropriate exercises and adaptations.  I had an overzealous day with scissors several years ago when I was making collages, and woke up unable to extend my pointer finger.  A hand therapist was instrumental in helping me protect my hands.

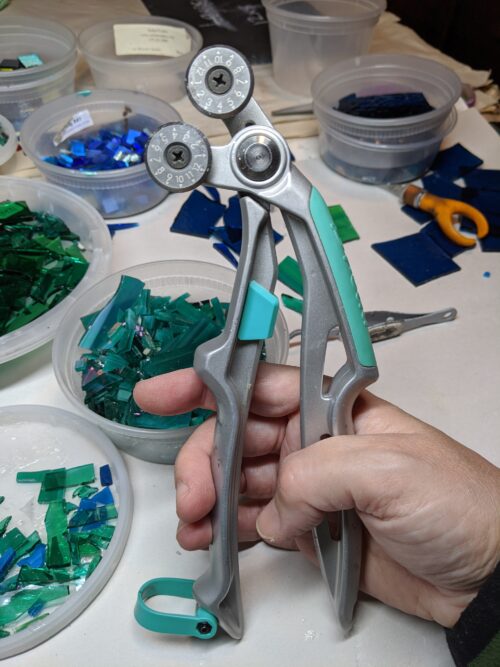
11.  [2021] The Breda Nipper came on the market and is made of cast aluminum. It is light and you hold it in a more natural wrist position. The blades are replaceable. It was an investment compared to other wheeled nippers, but well worth it. I no longer need a padded glove for nipping.

Related Posts

Margaret Goldie: Teacher of the Alexander Technique

Ted Hallman: The Alexander Technique in the Art Studio

An Artist’s Experience with the Alexander Technique:  Interview with Robert Rickover


Celtic Cross Mosaics: Circle of Light

Mosaic Cross for Wayne by Margaret Almon
Mosaic Cross for Wayne by Margaret Almon, glass and ceramic on WEDI board.

From the first time I thought of making a mosaic cross for my husband, I was drawn to the Celtic Cross, with its circle of light juxtaposed at the heart of the cross.  This particular form of the Christian symbol has many layers of folklore as to its origins, from remnants of an old sun god joining his disc to Christianity, to the circle representing eternity and God’s love.  Stephen Walker, metalsmith, has an interesting article on Celtic Cross History and Symbolism.

The cross I made for Wayne is unusual with its crazy paving.  I had a scrap of stained glass with a graduated shading from red to magenta to purple, and irregular pieces were the best way for me to preserve the color progression.
Putting the iridized glass together for the circle was a powerful experience, as the glow was intensified by the teal glass background, and incarnating the hope of a light shining in the darkness.  The cross below is a commission, which incorporates the same iridized glass into the circle, but this time the glass is in a less linear form, emanating like one of my mandalas.  I experimented with some of the many offcuts from nipping glass, to make a patchwork cross on slate which has tremendous light catching abilities.

Mosaic Cross in Red by Margaret Almon
Mosaic Cross in Red by Margaret Almon, glass on slate.

My mother, who is a minister, suggested a cross with interlocking rings, for weddings.


Wedding Cross by Margaret Almon
Wedding Cross by Margaret Almon, glass on slate.


Related:
Commissioning a Mosaic: 3 Questions to Consider

Rainbow Celtic Cross

A Celtic Cross Finds the One it was Meant For

Celtic Cross in Green and Amber
Over on Stratoz:
Wordless Wednesday: Bird in the Center(of a Celtic Cross)

Commission Cross for Mimi and John by Margaret Almon

Commissioning a Mosaic: 3 questions to consider

Commission Cross for Mimi and John by Margaret Almon

Writing about mosaic improvisation led me to reflect on the process of mosaic commissions.  When someone asks me to make a piece for them, I feel honored that they want to enter this process of creation with me.

Commissions inspire new ideas by the dialogue between the artist and the commissioner.  I thought it would be helpful to discuss three questions that are important to ask yourself if you are commissioning an artist to make a work.

1.  What aspects of the artist’s work speak to you?

There was a saying in the Moravian church I grew up in, “In essentials unity, in non-essentials liberty and in all things love.”  What are the essentials?  The colors, the size, the texture?  What means the most to you about this project?  Is there a color you love?  A particular shape?  If you want aqua, put it out there.

My work has topographic relief, a tactile textural quality where pieces are at different levels, and one of my first clients exclaimed that she loved the bumpy surface, and helped me create something she loved and gave her delight.  Communicating what draws you to the artist’s work will help put you both in the same room.

2.  How much uncertainty can you tolerate?

Commissioning a piece is by nature about uncertainty because it starts as an act of the imagination. Some clients are familiar with my range of work, and assume with some basic parameters, that they will love what I make for them.  Others want sketches, samples or check-ins as the project progresses.  The important thing is to communicate to the artist what your tolerance level is, and ask for what you need, such as photos of previous work or whatever else makes you more comfortable with the process.

Commissions are like a jazz set, where the tune goes in all sorts of unexpected directions, and just when you think you’ve lost the tune entirely, it comes back, and this can be immensely exciting.

3.  What is the story behind the work you want to commission?

Is there a narrative or memory that gives this work meaning for you?  Is it a frame for a photo of someone you love?  Does the work remind you someone or something?  The story can help the artist envision how this commissioned piece will fit into your life.

What questions do you really want to ask the artist?  Please ask!  Commissioning art is not something that happens in most people’s lives.  It’s unfamiliar territory.  A professional artist will help make you feel at ease, and answer your questions.

On my website, Nutmeg Designs Art: Commission FAQ’s and Process 

Over at Stratoz’s Blog:

Crafting on Thursdays–Commissions don’t need to be huge, and can be blue

Scrappy Mandala Grouted

I promised a post-grout photo of this scrappy mandala.  I love how the "raven" colored grout blends so well with the slate.  I was wondering why the photo came out orangey in the upper left section of the mosaic, and realized that the red stained glass was reflecting the plants outside our window, as I take my photos on our old wide windowsill.  If you look closely you can see bits of green reflected.  Photographing mosaics is always a challenge.  A mosaic is like chameleon!  Depending on what the light is like, the translucency of the tesserae, the angle.  It's magical setting up at a craft show and turning on all the halogen lights.  I've had people say they could've sworn the mandalas were lit from within.  

DSCN0951

Related Page:

Mandalas

Every Last Scrap

Every Last Scrap

Margaret Almon's Studio
Margaret Almon’s Studio, 2009

I once took a collage workshop where an array of beautiful handmade paper was spread on every surface, and we could choose which sheets we wanted to work with.  When we finished the first collage, the instructor then told us to gather all the scraps left over, and use these to make another collage.  After the initial spike of anxiety, this challenge had a kind of thrill, as I worked within limits, spurring on my creativity.   I liked the 2nd collage even more than the first one, and it was satisfying to use the scraps, the leavings, and create something new.  I keep the two collages in my studio(1st one on the right, 2nd one on the left), a reminder of two kinds of working–one out of an abundance of materials, an array on every surface, and another out of sparseness.  Too few choices can lead to a paucity, a deficit, but too many choices can lead to overwhelm.

Scraps of Glass in the Studio.

In making mosaics, I create a lot of fragments.  The nature of cutting glass, and tile, is like sculpting or woodcarving, paring away the material until the form is revealed.  Fortunately in mosaic, the fragments are every bit as valuable as the original uncut glass or tile.  For a couple years I saved all the tiniest bits, because I hated to imagine throwing them out.  Then one day I noticed that I had enough to cover a surface, and I was using them in delight.  I opened an tin of jagged scraps, non-linear ones, and set myself the challenge of making a mandala with them.  I used only fragments in the center, and then relented and let myself cut some larger pieces for the border.  My definition of “large” is still quite small, at least according to my husband.  Working with these scraps must be akin to scrappy quilts, crazy quilts, all the ways to use up the stash of small pieces, and make something new.

Scrappy Mandala in Progress by Margaret Almon

Scrappy Mandala Grouted

Over at Stratoz:

Stratozpheric Suncatcher from Scraps

Weldbond: A Mosaic Artist’s Friend

Working with Weldbond.
Working with Weldbond. Photo by Wayne Stratz.

Adhesive is an integral aspect of mosaic art.  The first mosaics I made were stepping stones, affixing pebbles to concrete pavers with thin-set cement mortar.  Thinset is finicky, like its cousin grout.  Once the process of becoming cement begins, you’re on the clock.  Adding more thinset to a soupy mixture or adding more water or admix to a bread-dough type consistency weakens the adhesive qualities.  Thinset also has a memory, and once you stick a pebble down, the thinset won’t be happy if you move it.  I learned to mix small batches in deli containers to reduce waste.

Then I took a class, and was introduced to Weldbond:  Universal Space Age Adhesive.  How could anyone resist that name?  And for me, the fact it was from Canada was all the better, since I grew up in Alberta.  Weldbond is not for stepping stones; it is water-soluble.  But what a relief from thinset. Mosaic artists can have long earnest debates about adhesives(our mosaic-geekiness showing through), and tend to be loyal to different kinds.  I am a Weldbond Woman.  If I was primarily a garden artist, sign artist or maker of public art, I can see how I would be swayed by thinset, but I make mosaics for the home, mostly inside.

Weldbond is a non-toxic white pvc glue.  It can bond just about anything and works well with glass because it dries clear.   I like working with translucent and transparent glass, to let light in, and increase the glowing intensity of color, so I don’t want a glue interfering.  It does require patience, as it can take a couple weeks to completly turn clear if you are applying glass on glass, and if you grout too soon, the air can’t get in to complete the process. But this is a fine trade-off for not having to open the window to air out fumes as with silicone adhesive.  It sets up within the day, but I always wait at least 24 hours before grouting.  The longer is sets, the stronger the bond gets.

I gave up on the small bottles, which tend to clog, and have ordered it online by the gallon from ACE(it’s mostly carried by independent hardware stores and online mosaic supply shops).  I pour a small amount onto a plastic deli lid and either dip tesserae in using tweezers, my fingers, or spread the glue onto the substrate with a putty knife.  It takes practice to know how much glue to apply.  You want enough to coat but not so much that it oozes up between pieces, clogging up the groutlines.

If I really am troubled by a particular piece already glued down and set, I brush a little water around the piece, let it sit 5-10 minutes and lever it up with an awl or other sharp pointy instrument.  Sometimes a bit of the substrates comes up too, but it’s manageable.  Wear eye protection if you perform this operation, because glass can splinter when you apply force and it’s not fully loosened.  I make it a practice to leave individual pieces alone, until there are enough of them glued down to see if anything is glaring, or interrupting the flow, and then, I still remind myself that it’s the total effect that matters, and if I get in a mood and pull up more than I glue, it’s still never going to be perfect.

A final bonus with Weldbond–if you leave a bit out on the lid, and it dries clear, you can pull the clear vinyl-like disc off in a most satisfying manner.


Related:

5 Essential Tools for the Beginning Mosaic Maker

Grouting a Mosaic Part 3: Remove Grout, Add Light

Wipe away the grout too soon and it all comes out of the gaps, degrouting your mosaic. It’s a balance of removing the excess before it hardens, without undoing the grouting.

And then the magic of the color emerging! This is the point of hope and relief and transformation. The color reasserts itself, comes glowing through the haze. I can scrub harder with a microfiber cloth, and dislodge the sandy residue. The process is much easier to handle if I just accept the studio will look like a herd of muddy cats came skittering through. I was fortunate to read some helpful advice on the Mosaic Artists Online Group about “dry grouting.” Some books suggest a slightly damp sponge for cleaning off grout, but that rejuvenates the muddy nature of the grout and can be very frustrating. Instead, the gentle friction of the microfiber cloth removes most of the haze.

I remove the green masking, and let the grout fully set for 48 hours, before sealing with Tile Lab Penetrating Sealer. I apply a coat with a paintbrush, and it soak in for 5-10 minutes, before polishing with a clean cloth, and repeating. The grout drinks up the sealer, and the sealer loosens the stubborn bits of haze from the tiles. Any remaining haze can usually be removed with a cotton swab lightly dipped in vinegar(I dab the swab on a paper towel after dipping). Vinegar is the nemesis of grout–acid to its alkaline, but small amounts applied just to the tiles for cleaning is very effective. I use a dental pick to dig out any buried areas, and excess glue–the scrubbies remove most of the glue, but some remains. The center orange glass tile has pinholes, and these require more effort with the dental pick. The red outer tiles are made of recycled bottles, with a smooth iridescent finish, and are a delight to clean. It’s as if they want to be cleaned, and shed the grout gracefully.

Then my husband takes a glowing picture of the final incarnation, and comes up with the cool caption of “Remove Grout, Add Light.”


Grouting a Mosaic Part 2: Take Courage

According to Constellations of Words,

The word congruent comes from the Indo-European root *ghreu– ‘To rub, grind’. Derivatives: grit, groats, grout, gruel, grueling, great, groat, gruesome, chroma (color), chromatic, chromato-, chrome, –chrome, chromium, chromo-, chromosome, gravel, congruent, congruence. Pokorny 2. ghreu– 460. Watkins

It is only fitting that grout is relate to “grueling” in origin, since there are moments where grouting appears to be a crazy idea.  After making my chocolate truffle mixture, and in my nitrile gloves, I scoop up a handful of grout and begin to cover my mosaics. Some mosaicists use a grout float or other tool for distributing the grout among the interstices, but with the variety of textures and heights of the tesserae in my work, I find applying it by hand to be most effective.  As I massage the grout into the gaps, all color is obliterated in a muddy coating.  This is a leap of faith.  Covering all the carefully glued pieces with a type of cement is counterintuitive.

Fortunately, I’ve grouted enough pieces to be somewhat adapted to the moment of transformation!  But even now, there is a realization of the point of no return.  Grout can bring a mosaic together, like its cousin “congruent,” or it can be divisive.  A dark grout unites the dark elements and breaks apart the light ones, and a light grout does the opposite.  This mirror has a medium tone that is fairly uniform across reds and oranges, so the brown grout is like a setting for jewel tones, the black velvet under the sparkly ring.  Grout is about relationships between colors, and can change the perception of the tiles, drawing them forward, pushing them back, intensifying or diluting the color.

Light Appears

Grouting a Mosaic: Part 1

Out of my growing collection of mosaics to grout, I choose the red-orange mirror, and the green box. I masked both with green painters tape, and both will receive “chocolate truffle” grout. Painters tape usually comes off quite cleanly, even after a week or so, and makes an attractive edge. It’s quite magical to peel away the green, especially when everything is covered in grout. Grout is a a way to pull all the pieces together. In drawing class, the equivalent to the grout lines was “negative space.” The spaces in between have their own form and substance. Grouting is commitment. It is possible to use a dremel drill to grind the cementitious grout out, but this isn’t something I can fathom doing.

First, I pour acrylic admix into the bottom of a plastic container, about 1/2 inch deep. My admix has been renamed “grout enhancer” by the manufacturer, which sounds like steroids. It’s the consistency of milk. I add grout slowly, 1/2 cup to start, and then back and forth between grout, mix, liquid, mix. Once it is between cake batter and peanut butter in texture, I leave it sit for a minute or two to slake. Or as my first mosaic instructor said, until you’ve lost patience or said hello to your neighbor. Then mix again. This makes the grout stronger, letting it form a few bonds and then remixing.

Chocolate Truffle Grout

There is a reason this one is called “chocolate.”


Getting Ready for the Grout Zone and Avoiding Mosaic Procrastination

Grout.  Grout. Grout.  I’m gearing up for a grouting session.  Designing, choosing tesserae, gluing–all these are intriguing in and of themselves.  Grouting is more of an act of faith.  I usually collect several pieces and grout all at once because getting organized takes a good part of the time.  Gloves, mask, acrylic admix, a container, a stirring implement, layers of blank newsprint that I can peel away one by one as the excess grout piles up.  Each mosaic needs to be masked with painter’s tape to protect frames and backs.  I cut up non-scratch scrubbies into 1 or 2 inch squares for helping the glass emerge from the grout, as well as get any blobs of glue on the surface of the tesserae.

Thinking about it probably takes more energy than actually getting started.  Procrastination creeps in, subtle at first.  “Well, I need to make a few more mosiacs that will need brown grout so I have several to do at once,” combined with the call of the glass.  I’ve talked to quilters who have a similar challenge, and accumulate multiple quilt tops that all need basting and stitching, and some get handed down from generation to generation until someone finally picks up the thread.

Starting a mosaic is the moment of possibility.  Grouting can feel like a test–will this turn out ok?  And it also requires moving into the grout zone–a meditative state of mind.  Once the admix meets the grout powder there is a limited amount of time of pliability before it cements.  You grout in “real time”–and this requires being present in the moment.  An hour is about as long as the grout remains workable.

I have grouted enough mosaics to know that the rewards are great in taking the grouting leap, but it’s still an awesome process.  My husband is going to take pictures of my next grouting session.  Stay tuned for the grout adventure!